gridThe grid geometry manager is useful for arranging widgets in grids or tables. A grid has a number of rows and columns and a widget can occupy one of more adjacent rows and columns.
A simple example of arranging three buttons; see also library('tcltk/examples/ex14.tcl'):
     button .b1 -text b1
     button .b2 -text b2
     button .b3 -text b3
     grid .b1 -row 0 -column 0
     grid .b2 -row 1 -column 0
     grid .b3 -row 0 -column 1 -rowspan 2
this will display button .b1 above button .b2. Button
.b3 will be displayed in the next column and it will take up two
rows.

grid Geometry ManagerHowever, .b3 will be displayed in the center of the space
allocated to it. It is possible to get it to expand to fill the two rows
it has using the -sticky option. The -sticky option says
to which edges of its cells a widget "sticks" to, i.e. expands to reach.
(This is like the fill and expand options in the pack manager.) So to
get .b3 to expand to fill its space we could use the following:
grid .b3 -sticky ns
which says stick in the north and south directions (top and bottom).
This results in .b3 taking up two rows and filling them.

grid Geometry Manager, Cells With Sticky Edges grid columnconfigure . 0 -weight 1
grid columnconfigure . 1 -weight 2
which says that the weight of column 0 for master . (the root window)
is 1 and the weight of column 1 is 2. Since column 1 has more weight than
column 0 it gets proportionately more space in the master.
It may not be apparent that this works until you resize the window.
You can see even more easily how much space is allocated to each button
by making expanding them to fill their space through the sticky option.
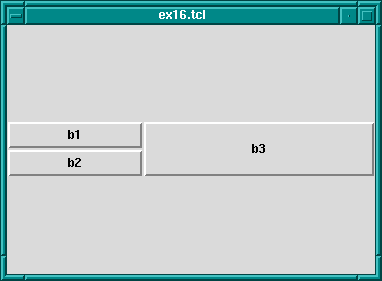
The whole example looks like this; see also library('tcltk/examples/ex16.tcl'):
button .b1 -text b1
button .b2 -text b2
button .b3 -text b3
grid .b1 -row 0 -column 0 -sticky nsew
grid .b2 -row 1 -column 0 -sticky nsew
grid .b3 -row 0 -column 1 -rowspan 2 -sticky nsew
     grid columnconfigure . 0 -weight 1
     grid columnconfigure . 1 -weight 2
Now resize the window to various sizes and we will see that button
.b3 has twice the width of buttons .b1 and .b2.

grid rowconfigure command.
For other options and a full explanation of the grid manager see the manual.